This is the horrible spaghetti like mess I inherited when I bought Britannia. The original plastic water pipes were in the bottom of the bilge and constantly leaking. It was always a contortionist sort of job to even tighten a fitting that had either vibrated loose, or cracked through old age. On talking to other owners of old boats it would seem it is a common problem as plastic pipes and fittings become brittle due to heat, cold, and vibration. I therefore decided to replace the whole system with new modern fittings and pipes, along with a more powerful water pump than the present pump that was not powerful enough to allow multiple outlets to be used at the same time. I found an ideal pipework system that is used in new home construction and also to replace copper and lead pipes. I reasoned that if they were considered suitable to install permanently behind walls, then it would also be suitable for my boat plumbing.New water pipe coils, red for hot, blue for cold

First I bought two 100 foot coils of half inch diameter PEX 1/2” inch internal diameter pipe. One coil is red for hot water the other blue for cold. This in itself would be an improvement, because the old pipes were all grey and when they were all cold it was difficult to know which was which. The original pipes had also been routed in the most difficult way possible behind bulkheads and panels. This is always easy when building a boat but not for owner maintenance. I therefore planned to re-route my new pipes in a more visible way, so I could inspect them and get to the connections. This would also shorten the pipe lengths.

I bought matching PEX pipe connectors, guaranteed up to 100 psi. I worked out roughly how many elbows, tees, and straight connectors I thought I might need. I actually used 28 and took the residue back to the The pipe just pushes into the fitting and locks, to remove it  the blue horseshoe fitting is pushed on the tube and the tube can be pulled out of the fitting.store for a refund.

The connectors are easy to join to the pipe, a small insert is placed in the end of the pipe that is then simply pushed into the connector until it bottoms through an O ring in the fitting that seals the joint. The pipe is prevented from blowing out by an internal barbed ring. They are also surprisingly easy to disconnect: a small C shaped removal tool is placed over the pipe then pushed against the fitting while at the same time the pipe is pulled, and out it pops.

This was totally different from the original connectors, where the female outer bezel first had to be slid on the pipe along with a sharp barbed ring, (that I cut myself on more than once), along with a plastic ferrule. The outer coupling then had to be screwed into its male connector, but not too tight or the plastic coupling could easily crack and the whole business had to start again. Repairing one of these in the bottom of the bilge was a tedious operation, especially if it occurred behind a pane, and it was happening more and more frequently.

                                                                                          INSTALLATION OF PIPES

Uncoiling the new tightly rolled plastic pipe was like wrestling an octopus. It didn't want to form into anything like a straight length so I decided to tie one end to the pulpit and uncoil it down the deck and tie it to the stern rail then leave it there in the Florida sunshine. This did the trick and within a few hours the pipe had succumbed to the heat and become workably straight. I still had to drill some awkward 3/4” inch holes through bulkheads and such, to reroute the pipes more directly to the aft cabin bathroom/shower, the forward bathroom/shower, and the galley. Britannia has ten separate hot and cold outlets, including the washing machine so there was not much pipe left over after I had routed the two colors to the various faucets.

We had been living with the three gallon per minute electric pump since buying the boat, but it never really had enough pressure to supply both bathroom washbasin faucets at the same time except with a dribble, and simultaneous warm showers were out of the question. I therefore decided to double the flow with a Par-Max Plus, six gallon per minute diaphragm pump. This is a big powerful machine and I was a bit weary of increasing the pressure from 35 psi to 60 psi, but if it proved to be too much I knew I could return it for a pump with a lesser flow.

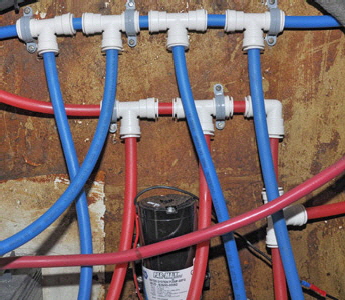
The main distribution manifold from the pump to all outlets.After I had routed all the pipes to their various outlets I then set about making hot and cold manifolds using T connectors joined together. These were screwed to the side of the equipment bay just below the cabin sole, where they would be easy to get at in the event of a failure. I installed the heavy pump just below these, These pipe cutters slice through the pipe with no burs.head down as per instructions. It was then just a question of connecting the various pipes to the manifolds. Cutting this type of pipe is made very much easier using pipe cutting shears that slice through the pipe perfectly square and burr free.

It had taken two days to get this far and I had left the old pipes and pump in place to maintain our water supply. It was also helpful to be able to double check the old connections against the existing layout to ensure I was joining the right pipe to the hot and cold side. This was made much easier by the color coded pipes.

On the third day I was ready to disconnect the old pipes and connect the new, but before this we filled a few pans and the kettle with water because it would not be possible to run any water until all the faucets were reconnected. This took the best part of a day, reaching inside cupboards, unscrewing the old connectors and connecting the new ones. One reason it took so long was because the outlets, taps, showers, etc., didn't all have the same size threads - after all it is a boat! So there were the inevitable couple of trips back to the store to buy adapters and exchange fittings. I also had to fit a larger contact breaker in the circuit board from 15 amp to 20 amps, to carry the increased draw of the larger pump.

Britannia also has a shore water connection, also known as a City water supply, that we connect when in marinas to save using the pump and batteries. A hose connects from a dock faucet to a pressure reducing inlet on the boat and pressurizes the boat's water system. This gives a constant pressure in the boat's water system without using any pumps or battery power, that also means no noisy pumps. It also gives a more even flow to a shower than using a small pulsating pressure pump. Also, if you have small tanks it saves having to fill them up at all.
                                                                                       THE MOMENT OF TRUTH

Since there was only air in all the new pipes I opened all the faucets, checked all my fittings for the third time, then pushed the contact breaker. The pump immediately started up, then ran and ran and ran with absolutely no sign of water at any faucet. These new style diaphragm pumps are capable of running dry so I was not much bothered, but after a few minutes I began to wonder why not even the slightest spurt was coming out of even the nearest outlet to the pump. Then it suddenly dawned on me: both water tanks had shut off valves that enable each to be used as required. I remembered closing these while I connected the new system but I couldn't remember ever opening them. Without thinking to switch off the pump I quickly lifted the floor board under where the values The two showers are now as powerful and a house shower.were located. Both valves were closed and I quickly opened one. The pump instantly changed its tone as though it was talking to me, and what it was saying was not very complimentary.

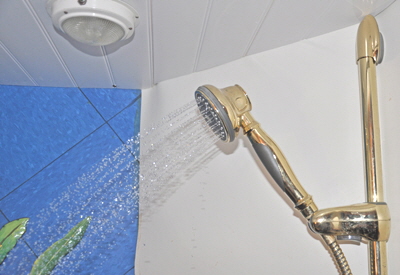
In an instant water gushed out of all the faucets with so much more force than we had been used to. I switched some off then turned on the shower in the aft cabin that was now as powerful as our house shower. I quickly made an inspection of all the connectors and I would be lying if I said I had no leaks. I had not pushed the pipe fully into three connectors to engage the O ring, but that was easy to remedy. There were also a couple of straight threaded connectors that dripped, that were easily stopped by a few extra turns with a wrench. After this all became silent; until I opened a faucet and the pressure drop activated the pump that again stopped the moment the tap was closed. Wow!

                                                                                       AUTOMATIC FAIL SAFE

Dock water hoses can be seen connected to lots of boats in marinas. A water hose connects to a dock faucet and a pressure reducing inlet on the boat. This reduces municipal water pressure, usually around 60 lbs, to about 35 lbs, and pressurizes the boats water system.

Britannia had this system built in from new and we liked the advantages and convenience. The advantages are, constant pressure in the boats water system without using pumps or battery power, a more even flow than a small pulsating pressure pump can deliver for say, a shower, and silent operation. But I was conscious that even with new pipes and connectors if nobody was on board to hear the bilge pump running, there would be nothing to prevent the boat flooding completely and eventually sinking. My thoughts therefore turned to how to make a fail safe system. I had already fitted stop valves on the hot and cold supply to the washing machine just in case the valves on the washer failed.

The obvious first safety method is to always switch the water off on the dock when leaving the boat, but that's not really foolproof because it's easy to forget. Some people suggested not using a dock water hose at all, drawing from the tanks and refilling them as needed. But you might say the same about a shore power electrical connection that everyone uses without a second thought, but that has been the cause of many an electrical fire.

As a quick added safeguard I fitted a shut-off tap at the hose and pressure connection, just in case anyone switched the dock faucet on again. This was still not an automatic safety measure so I considered how I might install some sort of automatic shut-off.

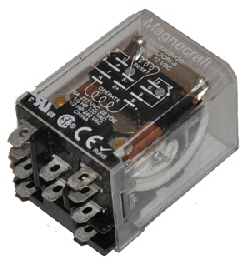
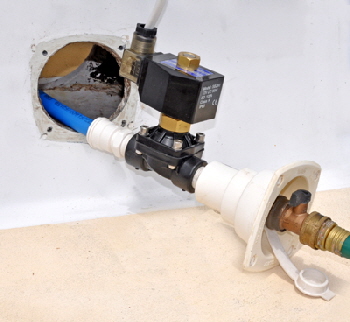
This is the latchingrelay that keeps the solonoid closed if there is a leak.This shows the shut-off valve and the pressure reducing valve.HRI found a 12-volt solenoid water shut off valve at Sizto Tech Corporation, in Palo Alto, California, for $74.25. It is normally open, but instantly closes when voltage is applied. I connected it directly after the pressure inlet and wired it to the bilge pump float switch. On tests it closed flawlessly when the bilge pump came on activated by the float switch. I thought I had therefore solved the problem, but when the bilge pump lowered the water and the float switched off the valve opened again allowing water the flow and the cycle repeated itself continuously. To prevent this I incorporated what is called a latching relay, from Xoro.com for $22.89. Part # 785XBXCD-12D. This works like a normal relay except that when the primary power disconnects because the float has switched off, the secondary circuit stays live and keeps the water shut off valve closed. The relay only powers off when the circuit is manually switched off at a breaker.

I also wired a bell into the circuit that rings when the relay is activated. In other words, the boat now has a high water bilge alarm that is required by many marine insurance companies.

I tested the system by filling the bilge with fresh water until the float switch activated the bilge pump, and simultaneously switching the shore water supply off. The pump quickly emptied the bilge and the float then went down and switched itself off, but the water solenoid stayed activate, closing off the shore supply until the contact breaker was switched off and on again.

Feeling very satisfied with myself I decided to find out how many boats in the two marinas in Titusville, Florida had shore water hoses permanently connected. Out of a total of twenty boats with direct shore water connections I managed to actually ask the owners of twelve if they had any fail safe method in case of an internal water pipe failure. Amazingly absolutely none did! They all relied on remembering to switch the water off when they left the boat, or hearing the bilge pump working frantically even when they were aboard.


and a fail-safe shore water supply system.
Water pipes - header
Back to navigtion
these were the old hot and cold water pipes that were constantly leaking or breaking.