When we bought the boat this bathroom was a poky little hole, with a tiny ‘un-stainless’ steel washbasin and a minimum size manual toilet that I could never manage to stop leaking. Furthermore, the head was not plumbed into the holding tank as I was led to believe by the broker. It discharged directly overboard that is illegal in American waters. One reason for this was because the aluminum holding tank was full of holes.
There was no shower because there was no space for one, unless you sat on the toilet and soaked everything else as well! Consequently there was no discharge system under the grating. Any leakage went straight into the bilge, that is not a good idea when a toilet leaks.
I closed all the sea-cocks and we never used the place except for storage of fenders and ropes. It was a waste of space, so I started to consider what could be done with it.
The problem was the limited space, because the room was only three feet six inches long. However, there was an 18” inch wide full depth locker immediately forward of the bathroom with its door opening into the corridor and not actually attached to either of the two forward cabins. Each cabin had its own hanging locker anyway, so after careful measurement I decided to incorporate this space into the bathroom.
I cut out the bulkhead between the bathroom and the locker using a reciprocating saw, a chisel and a big hammer, to reveal a deceptively large space. Then the locker door and frame was removed and I used the teak plywood from the bulkhead to fill the gap where the door had been. Nobody would ever know there was once a hanging locker here.
The old washbasin and toilet, along with their pipes were removed and thrown away. As was the smelly backing panel and other side panels. The Portlight also came out, to be re-bedded with new sealing compound. The vinyl ceiling material was ripped out as well.
As is well known by people who work on boats, one thing leads to another, and another, and another...
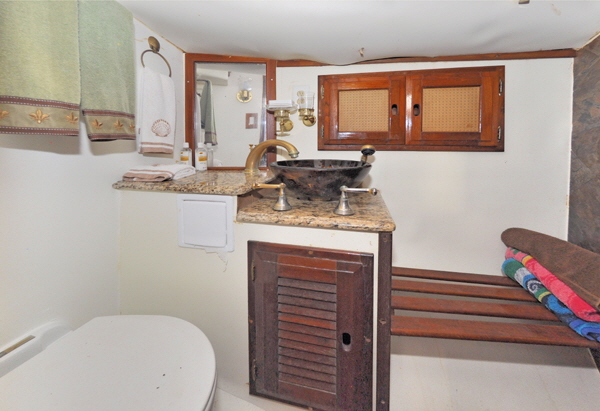
The whole room was now gutted and I could see what I had to work with. After a lot of measuring and drawings I decided that the widest part of the area, where the old toilet had been, would now make a good shower stall. A new toilet would also fit nicely in the locker space, and I could then fit a similar vessel washbasin and faucet like in the aft bathroom.
I bought the same ‘Elegance’ toilet as I had installed in the aft bathroom, and the same style faucet and taps. I decided to also install the Purisan waste system that was working so well in the aft head. the boat would then have two completely independent heads, both with a US Coast Guard approved waste treatment system. The toilet also fitted flush against the bulkhead and I was able to route the inlet and discharge pipes down through the floor, so no pipes are visible at all in this bathroom. I hate to see marine heads with exposed pipes and valves, when with a bit more effort they can usually be enclosed.
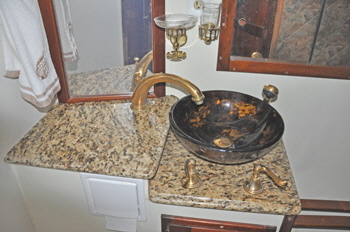
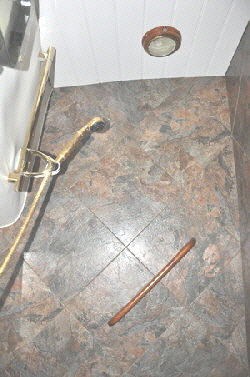
I installed faucets the same style as the aft bathroom, but having a shower head on a flexible pull out cord, hooking to a polished wall mounting bracket.
It was not difficult to modify the existing sink locker to mount the new bowl, but like in the aft bathroom the single faucet needed mounting higher to be able to run into the bowl. I therefore built a raised section and fitted both levels with polished marble tops.
Shifting the toilet to where the locker had been left a nice space for a shower. The shower drains through the teak grating into an automatic discharge sump that pumps out through a vented loop into the wash basin drain sea-cock.
I tiled this area with 1/8” inch thick waterproof vinyl tiles glued to the walls and thoroughly caulked. The back panels were finished with plastic sheet. I then built a seat of teak slats (from the fore cabin walls), to be able to sit down while showering under way.
I replaced the old wicker sliding doors with mirrors, giving the room a much larger and brighter feel.
The ceiling, that now also included the old locker was clad with PVC tongue and groove panels that form a very nice rot-proof ceiling, and a degree of insulation that the old vinyl did not. They were simply screwed and pinned to the existing cross-bars with all the wiring for the ceiling lights concealed above.
I installed two 120-volt wall sconce lights. Both the 12-volt and the 120-volt lights work from the same dual toggle switch. When in port we use the 120-volt supply and when at sea the 12-volt lamps.
The bathroom now looks more like an elegant yacht of a bygone era, yet it is modern and extremely functional.
REMODELING A TINY BATHROOM