Most sailboat owners will have heard of the new super-strong rope known collectively under the trade name Dyneema®, but sold under various names by rope makers who weave the fibers into rope for marine use. The technical name is quite a mouthful: Ultra-high-molecular-weight-polyethylene and with an equally difficult to remember acronym, UHMWPE. I didn't know much about it or ever actually used it until I considered it as a substitute for the wire on Britannia’s worn out lifelines that needed replacing due to old age and serious chafe.
Dyneema rope is considerably stronger, size for size, than double braided rope and also stronger than stainless wire of the same thickness. For example: 1/4” inch 7x7 stainless steel 316 wire has a tensile strength of about 4800 lbs. The same thickness in double braided line is roughly 4250 lbs., but 12 strand single braid Dyneema has an amazing tensile strength of between 8,000 and 12,000 lbs. Note: There are variations of Dyneema and these figures vary from one maker to another. Still, the potential of substituting Dyneema for many lines on a sailboat now becomes a viable possibility.
Not only is Dyneema stronger than wire, it is also about six times lighter than the comparable thickness of 1x19 stainless wire that is mostly used for standing rigging on sailboats. My old wire lifelines weighed 13 lbs., and the same length of Dyneema rope weighed only 2.4 lbs., saving a massive 10.6 lbs.. Well it all helps, doesn't it? More interestingly there is about 750 feet of 3/8” inch diameter wire rigging on Britannia that weighs 0.332 lbs., per foot - that's a total of 249 lbs. If I switched all that to Dyneema it would save approximately 220 lbs. of high topside weight. Now that is significant!
What puts many sailboat owners off Dyneema is its price which in most retail boating outlets is about twice that of comparable size double braided rope. However, Miami Cordage Inc., a rope maker hidden in the industrial depths of Miami, Florida, is considerably less than the regular retail outlets most boaters - including me - have previously uses. Most owners will not have heard of them because nearly all their product goes to the United States Navy and Coast Guard, and other industrial outlets. Yet they make every conceivable type of rope, from old style three strand Manila to 12 strand Dyneema that they call Ironlite, and they sell over the counter.
I discovered another significant benefit in using Dyneema, that is the ease of which an eye-splice can be formed, unlike the complicated, (at least for me), class one reverse-tuck procedure.
 Unlike double-braided rope, twelve strand Dyneema is hollow with no center core. To make an eye-splice the tail is simply buried deep inside the standing part and lock stitched. This is an easy operation using a special 14” inch long splicing wand from Brion Toss rigging. This fid enables the tapered rope end to be gripped by the wand, then pulled through the core instead of pushing it in with a conventional fid and push bar. With sixteen splices to make for my new lifelines I was very thankful to have one of these neat tools that can also be used for other rope-work.
EYE-SPLICING DYNEEMA.
I used Miami Cordage 1/4” inch Dyneema for Britannia’s new lifelines, and for added appearance I used their solid blue color that nicely matched the boat’s Royal Blue topsides. I therefore made my lifeline splices using the end connections from CS Johnson, that are designed for the purpose. The process is the same if you are using a regular thimble to make a normal eye splice.
Note: You will need a very sharp blade to cut Dyneema and normal household scissors will not cut even a single strand. I found the best way to cut this rope is with a box cutter fitted with a new blade. Even with this I had to reverse the blade after making about five splices. Dyneema is tough stuff!

The splice tail should be about 30 times longer than the diameter of the rope. The tail of 1/4” inch rope should therefore be about 8” inches from the throat of the splice.
The tail is tapered by pulling out a pair of strands about one quarter of the way from the throat, then three more at roughly equal intervals. Do not cut these off.
 The splicing wand is then pushed into the core, a little bit further back from where the tail will end, then worked up inside the rope and out at the throat where the tail is to go into the splice. The tail end is then hooked through the thin rope loop on the wand and tightly locked with the knob in the handle.

The splicing wand can now be eased back through the rope pulling the tail with it. The pairs of strands should then be cut off flush just as they are about to enter the core.
 When all the tail is embedded the wand can be disconnected. Then, the rope is milked back from the splice, whereupon the end of the tail should vanish inside the rope. It's that simple, except for one final important operation.
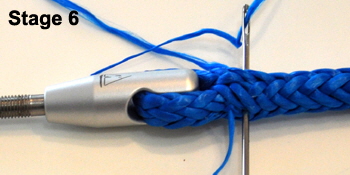
 Pull out a single strand of Dyneema about 24” inches long from some spare rope, then thread it into a stout needle and lock stitch tightly back along the rope, from the throat to roughly where the first taper was, now stitch back again at 90 degrees to that stitch. Tie the two ends of the stitch together with a reef knot and bury the ends in the rope. This lock stitching is important because it prevents the splice slipping under light loads. The strength of this type of splice increases dramatically under load as the outer cover constricts on the inner
  tail
tail
It's easy to become confused about the different manufacturers strength figures for Dyneema, because they vary quite a lot with the construction and material. Every time a knot or splice was tied in a rope it weakened it, (surprisingly, splices are stronger than knots), sometimes by as much as 50% percent, but 50% percent of what? What I needed to know was the strength of my own new splice. After all, there's not much point having rope with a breaking strain of thousands of pounds if you don't know what the weakest point is.

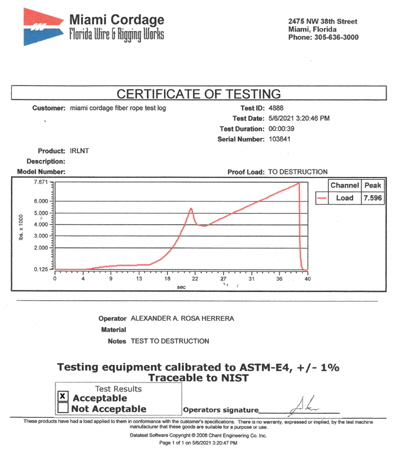
Miami Cordage Inc. have a government inspected and calibrated rope testing bed about 40’ feet long, on which they test the strengths of ropes for Navy and Coast Guard vessels. Jason Hoffman, the CEO, kindly agreed to test my splice to destruction
.
I made an eye splice on both ends of some spare 1/4’ inch diameter Dyneema rope, then drove 230 miles to the factory in Miami. This rope was attached to the machine and I watched as it stretched the line well past 2,000 lbs., It still held at 4,000 lbs., when the rope was as tight as a steel bar. Then finally, at an incredible 7596 lbs., the actual rope snapped, yet both my splices held! That's three and a quarter tons and I have a Government official certificate to prove it!
I am now seriously thinking of changing some of Britannia’s standing rigging for Dyneema. Exchanging my twin 59’ foot long back stays along with the 15’ foot triatic and foremast running back stays would save about 58 lbs. in high topside weight. From a rough calculation, that would be equivalent to 300 lbs. of ballast. No wonder the racing boys love Dyneema!
