Squaresails have been used on sailing vessels for centuries, and there is little argument between “square riggers’” that when the wind is dead astern, or a few points either side, an athwartship squares’l is still a very efficient way to propel a boat of any size, even today.

Anyone with triangular Bermudan sails knows how tricky it can be to keep them filled and hold a steady course when running before the wind, especially when a big sea is rolling up astern. It is often necessary to set preventer poles and an assortment of lines to hold the sails out, and certainly for a spinnaker. Even with these, the helmsman will still need to keep a keen eye on the wind and the course to prevent the sails collapsing, then re-filling with a loud ‘crack’, imposing great strain on the sail and rigging. Another concern with most of these head sail configurations, especially twin sails, is that they cannot easily be reefed and as the wind picks up hands have to go forward to deal with the situation. that is usually the time when nobody wants to go forward.

With a squaresail correctly braced there is absolutely none of this, and a boat becomes very stable. Yet the course can vary widely, by as much as 30 to 40 degrees either side. There is no concern about gybing or broaching, and the helmsman or autopilot will have little difficulty in keeping a steady downwind run. The boat will also roll less with a squares’l, the motion being more like a catamaran than a monohull.

However, there is undoubtedly a significant, almost insurmountable drawback to having a great flat sheet of canvas hanked on a yard high up a mast and billowing forth. That is, furling and unfurling the sail, not to mention reefing the darn thing! This single issue precludes the use of squaresails on all but vessels with large crews, like sail training ships with lots of young people able to scale the ratlines and edge out along a flimsy foot ropes to secure or release the canvas from the yard. Even if they are harnessed to the yard it is still a very very dangerous operation. But what if you could easily furl, unfurl and reef a squares’l from the safety of the deck, or better still the cockpit, without a single person having to go aloft? Now that would bring a completely different perspective to their use on a short handed sailboat!  I wanted a system that could be operated from the cockpit of Britannia, but how can that be done when for centuries men have gone aloft to furl the sails?
I had pondered this problem ever since sailing on Sir Winston Churchill, the British Sail Training Associations square-rigged schooner, and a few other square riggers.

I have been on boats with different arrangements of squaresails. One hauled the sail outwards from the mast, along the yard on a track like curtain drapes. The other simply hoisted the sail at the outermost ends and in the middle of the yard. Both had serious drawbacks in that they could not be reefed. They were either up or down, and lowering or brailing them to the mast was an “on deck” operation, a bit like dropping a large Genoa on a run.

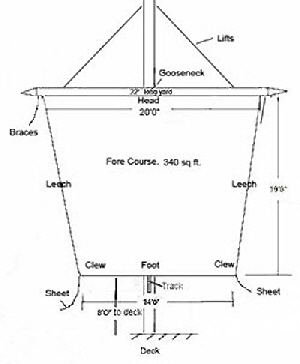
This is the drawing from which the sailmaker made the squaresail.I also considered another method; using a regular head sail roller furling system mounted horizontally in front of a yard. This would allow progressive reefing, but the point loads imposed on the ends of the yard would necessitate a heavy spar. The roller furling foil also bends outward at the head, and there is increased windage aloft. The sail also remains exposed at all times when rolled up

Inspiration finally dawned when I considered the concept of in-boom roller-furling. That got me thinking; why not use the same principal to roll a squaresail up and down like a blind? Nobody sells such a thing of course, so I set my mind to designing and making one that might be called, “The Hughes in-yard squaresail furling system.” Incidentally, a boat doesn't have to be a schooner to carry a squaresail, one could be installed on any rig including a sloop or ketch,

I contacted a number of marine architects and sail makers, but none were able to tell me how long the yard should be for my boat, nor the stresses on the yard, the sail or indeed the mast. I finished up at the Old Naval Dockyard in Chatham, England, where I found a formula for yards and sails for a British Frigate. I don't have a crew of 300 or any cannon, but the formula was all I found to work with.

It took nearly two years and a lot of engineering and experimentation, but Britannia now has a beautiful squaresail on her foremast. It is called the Fore Course, being the lowest athwart sail on a ships mast, in my case the foremast. It has proved to be absolutely fabulous for sailing down wind, and all furling and unfurling is done from the safety of the cockpit. The sail can be rolled up or down, or reefed part way according to the wind strength. When completely furled the yard presents little windage and the sail is protected from the elements inside the tubular spar and never gets wet even in the heaviest deluge.
                                                                                        BUILDING THE YARD

In squaresail terminology the complete horizontal spar is the yard; the section outboard of the lifts is the yard-arm; and the end of the yard arm is called the Flemish Horse and if you have ever been out there even in a calm sea you know why. In heavy weather it is more like riding a wild stallion. However, nobody rides the Flemish Horse on Britannia, and nor do I have leechlines, buntlines, bowlines, clew garnets or tack lines that are all needed to handle a regular square sail. I just have two lines marked ‘sail up’ and ‘sail down.’

The original mast extrusion before being cut down.The extrusion after being partially cut to form the yard.Before I could begin to build my design the first question was; where to find a strong 22’ foot long aluminum tube with a slot all the way along to form the yard? I did all sorts of searching on the web, but the answer finally came one day, as I pondered a boats in-mast furling system: Why not just remove the front section of a roller furling mast extrusion, leaving only the sail stowage tube with its ready-made slot all the way along?

Many in mast extrusions are available, so it was necessary to find out what diameter tube was needed to accommodate the sail when rolled up inside. This was achieved by simply winding a 19’ foot strip of sail cloth round a 2” inch round wooden pole, to simulate the internal mandrel that winds the sail in and out. This resulted in twenty turns of canvas, and an interior diameter of 5” inches.

Mast suppliers sounded surprised, if not a little nervous when I asked “How much for a twenty two foot length of your # xyz mast section?” These extrusions are normally supplied as masts three and four times that length. Nevertheless, Charleston Spa, in Charlotte North Carolina, had the right section at the right price, This suited me in another way; I planned to fabricate the yard at my daughter's printing works factory in Hickory, NC, only fifty miles from Charlotte.

This is the driver which turns the mandrel and operates the square sail.I had plenty of room to maneuver the spar in the factory warehouse, where I first sawed the complete front off using a circular saw with a 60 tooth carbide tipped blade. This made a great din, and caused some strange looks from the employees that was answered by the foreman saying, “Its only Samantha's dad. He's building a boat.” Then I found a local welder to come and attach lugs to carry lifts, hoist, braces and fairleads. I also shaped a couple of yard ends out of cedar blocks that are removable, to give access to the mechanisms in each end.

I bought a Facnor rope driver winch that is normally used on their vertical in mast systems, and after some grinding I managed to slide the driver snuggly inside one end of my tube, so that only the furling line sheaves are exposed. The other end of the mandrel was secured with a large plate and thrust bearing and nut that can be tensioned to reduce sag in the mandrel.

Suddenly I had my yard.The yard end shaped and attached.

The next essential item in this experiment was a sail, but I didn't want to buy an expensive Dacron sail without first knowing if the system worked. So I fashioned one myself from cheap plastic tarp and just glued the edges into the right shape. This actually produced quite an effective test sail when I finally tried in on Britannia, except one side was green and the other brown making the boat look more like the Kon-Tiki raft than a modern sailboat.
 

A trial sail with a cheap "tarp".The first trial of the test tarp sail in the warehouse.To prevent bunching at each end as it rolled up inside the yard the sail was not in fact square. My sail is a trapezium, 20’ feet wide at the top (head) but only 14’ wide at the bottom (foot), with a 19’ foot drop. When the sail rolls up inside the yard the sides, (leeches) where the sail is thickest due to the edge stitching, just “barber-poles” and does not overlap so there is no bunching.

With my home-made sail rolled round the mandrel and stowed inside the yard I was itching to test it in some wind. I had my eye on a large wooden telegraph pole outside the factory, but my daughter quickly put a damper on that idea. “You mustn't do that Dad, you'll get me locked up!” I understood her concern but I still say there isn't actually any ordinance in Hickory, North Carolina, that forbids anyone hoisting a square sail up a telegraph pole. I settled for hoisting it on pulleys to the roof beams in the factory and used their large electric fans to provide some wind. This worked tolerably well and I was able to wind the sail up and down quite easily. So far, so good.

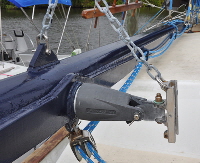
Now I needed a goose neck to attach the yard to the mast. It had to be a very strong and secure connection from the center of the yard. Yet it also had to be detachable, in case the sail jammed or other emergency. It had to pivot from side to side to brace the yard left or right according to the wind. It had to rotate to permit the yard to cant (tilt), when docking in confined marinas. It certainly would be asking for trouble to try to squeeze a boat into a normal slip with a 22’ foot pole sticking out the sides. This is the yard gooseneck which will move in all directions to brace the sail to the wind.All this was achieved by modifying a spinnaker pole end, bolted to a traveler sliding on a track all the way up the front of the mast.

The yard transporter, used to carry the strut from North Carolina to Florida.I finally transported the yard 650 miles to Britannia in Florida, strapped securely, (I hoped) to the roof of my mini van on a wooden framework, and I was very relieved to finally get it to the boat.

After a lot of trials and errors with my makeshift sail we got Britannia sailing at 4.0 knots with only a light ten knot following wind and my 11 year old grandson steering, and frequently over steering as landlubbers often do. This would be quite unacceptable with normal fore and aft sails that requires skill to keep them filling and to avoid gybing the main or mizzen sails. In downwind conditions it is often necessary to pole out the jib and fit preventers on booms. It is not the sort of thing you entrust to a young lad who had never steered a sailboat before.

The trial tarp sail also worked quite well.By this time I was in quite deeply financially, and if I was going to continue I was now faced with buying the most expensive item, a real sail. This turned out to be not that easy either because I couldn't find any sail maker who had actually ever made a squaresail, never mind one that would roll up inside a 5½” inch diameter tube.

Things I learned through practical tests were; the foot of the sail needed to be straight, not concave like a normal square sail. It  also worked better with a batten all along inside the foot, preventing it billowing forward too much and helping to keep it straight when furling. The sail was also made without any built in curvature, (bunt), so it would roll better inside the yard. Scott Lomas, with Doyle Sails in Stewart, Florida, showed the most interest, so I ordered the sail from him. When it arrived the last stage of the grand experiment could now be take place.

The real sail arrives at last.I was always a little concerned about overall topside weight, along with the inertia effect such a protrusion might have 30’ feet up a swaying mast. I had calculated the theoretical overall weight and was pleased to find, with the actual sail now inside the yard, it was within 5 lbs of my calculations at 135 lbs. This is less than an average man climbing the mast, but the moment of inertia would be greater since the yard protruded well outside the boats roll center. Just to be on the safe side I increased all the foremast rigging sizes, including the two fore-stays and triatic stay, and beefed it up further with two running backstays for good measure.

                                                                                       THE DAY OF RECKONING.

The wind was ideal, ten to fifteen knots straight down the intracoastal waterway. We steamed up wind for a while then turned round and cut the engine to face the true moment of reckoning at long last.

As helpers tendered each sheet, I hauled the “down” line and the sail began to unwind from inside the yard. As the wind caught the canvas it actually began to unfurl itself, but I controlled that by slipping the “up” rope round a cleat. I cautiously eased out more and more sail and soon the whole 340 square feet billowed majestically before us. The sheets were winched in as I felt the boat gather speed and within minutes there was a small wave under the bow as we coasted downwind at 5 knots. It was a great sight to see the beautiful white sail filling so well.

The boat did not heel or roll as it would have done under Bermudian sails. The motion was more like a catamaran and was so steady I felt no trepidation in steering straight through the narrow gap under the first bridge. At least it seemed pretty narrow when your 14’ foot boat is suddenly 25’ feet wide. A speedboat overtook us with people“fabulous,” “great show,” that was very gratifying.

Unrolling the sail was easy enough but now came the second and really the more important test: Would it roll smoothly back into the yard? We had experienced problems winding the plastic sheet both in and out when it sometimes overlapped itself and occasionally jammed completely to the point we had to lower the yard. I was fairly sure this was due to the flimsiness of the material and reasoned that 5oz Dacron should be much more stable. At this precise moment I earnestly hoped so, otherwise we might have finished up in Miami, since you can't just turn a squaresail into the wind and stop. There was only one way to find out?

As my crew eased the sheets and spilled some wind I hauled the “up” rope. It was certainly harder than unfurling, but once I got it round a winch it was easy enough and became lighter as the sail reduced and finally disappeared into the yard  “As clean as a whistle!” Wow!” Another milestone passed, what a relief.

The yard must be canted before entering a slip.Knowing the sail can be progressively reefed to just a few feet of canvas will be a great reassurance as the wind pipes up. I now wanted to see how many degrees we could sail off the wind with the yard fully braced.

After motoring back to our start point I then steered a zigzag course downwind, bracing the yard first to port then to starboard. Amazingly, the sail never lost wind even when three points, that is 34 degrees, either side off the stern. This will allow a great degree of latitude when sailing down wind with a big following sea, that tends to slew a Bermudan rigged boat sideways, called broaching, and can be very dangerous. It will also be less power consuming on the autopilot that won't have to constantly correct that tendency.

All in all the days trial was a successful conclusion to a lot of hard work and expense, celebrated with a bottle of bubbly as we steamed back to the marina, and no, I did not forget to cant the yard before entering our slip.

Another simplification I made was to splice both ends of the furling line together, into a loop using a continuous splice. This reduced the rope length considerably since only a short loop was needed in the cockpit to go three times round the winch. When the up or down line was hauled the other end simply followed the line around. This was possible after I devised a splice which would be no thicker than the 3/8” inch line used on the driver, whereas most continuous line splices result in a thicker line, that will not easily pass through sheaves of the same diameter.

To make winding the furling winch easier I bought an electric winch handle, that effortlessly spins winches twice as fast as by hand and winds the squaresail up in minutes. This labor-saving device can also be used on all the other winches.
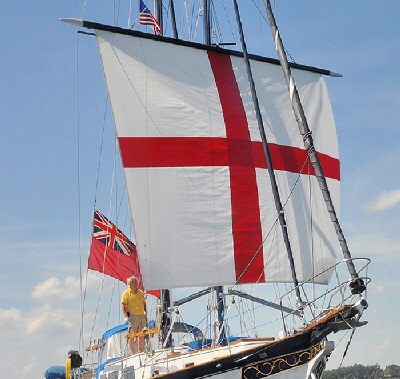
The red cross on the white ground is the English flag that forms part of the Union Jack. It is also the Templar’s Cross and the emblem of the Red Cross Association. But that will just add to the mystery as my “little” tall ship is spotted on the horizon.

                                                                                                   THE COST:

I had a stiff whiskey on hand as I added up all the equipment and ancillary costs, including sub-contractors fees for special jobs, like welding. Overall it came to $3,736.00 not counting my labor. Four pieces of equipment alone represented about three quarters of this. The rope driver was $600.00, the yard tube and mandrel $400.00, the gooseneck and traveler $380.00 and the sail $1,550.00. Re-rigging with heavier stainless wire was included in the cost of converting the boat from a ketch to a schooner, and is another story altogether.

I didn't know what to compare this unusual project to, to appraise whether it was expensive or not. Ultimately it just comes down to what you want, and what you are prepared to do if you can't actually buy something ready made. There were times when I was ready to quit and my family thought I was quite nuts anyway, that is probably true. But now, when I unfurl my beautiful sail that I designed and engineered all on my own, and see it billowing forth, I'm pleased I persevered. My small square rigger is now unique.

There is another advantage of having a yard on the foremast. If the skipper fancies a gin & tonic around noon, but the sun is still not yet over the yard we just lower the yard a bit - problem solved.
 

squaresailHR4

IN PRAISE OF THE SQUARE SAIL

Return to the articles gallery here.