When I bought Britannia it had an old front opening refrigerator that didn't cool very well along with a built in ice box that only kept 20 lbs of ice for a day before it melted. The first thing I did was remove the old refrigerator and slide a nice new stainless steel Indel unit in the same place, but this didn't hold frozen food so I began to consider if I might be able to convert the ice box into a proper freezer. The box was completely encapsulated in the side of the galley molding with one side against the hull. It was 29” inches deep and extremely difficult to reach the bottom through the small 12” inch square lid, but there was a shelf half way where food could be placed and ice packed underneath.

The lid of a freezer is as important as the sides for insulation.I had absolutely no experience of building freezers and I wasn't even sure if it was possible. So I posted a question on the Cruisers Forum and received over 130 messages that varied from, “Impossible, buy a self contained fridge/freezer box,” to, “It depends on the thickness of the insulation.” The thread was viewed by more than 6500 members worldwide, so there is evidently great interest in what I was considering.

From these replies and talking to people it became apparent that insulation is the single most important portion of any boat freezer. I was advised that no less than four inches and preferably six inches of insulation thickness would be necessary to insulate the compartment for a freezer. One reason why insulation is so important on a sailboat is because you want the equipment running as little as possible to reduce battery drain. When the freezer is ‘off’ the inside of the box slowly starts to de-thaw so the thicker A view Inside-icebox the ice box before the holding tanks were installed.the insulation the slower the de-thawing process.

The inside of my ice box has a fibreglass inner shell 13” inches wide at the top and only 10” inches at the bottom. I therefore could not consider adding insulation to the inside of the box because it would reduce storage space. Nor could I do anything about the side of the box that was bonded to the hull, but I could get to the other three sides.

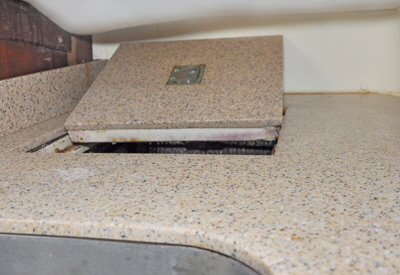
I first tried to discover what type of insulation was encasing the existing shell and what condition it was in after 37 years. I removed the Corrian work top that I had previously fitted on the galley, then drilled a few 1/2” inch exploratory holes in the sides and top, that seemed to turn out only dry foam. I also tried to cut into the top of the box in the hope of being able to better examine the insulation and replace it if necessary.

This is the freezer side-view drawing.The freezer end view drawing.This was one time when I wished Down Easters are not built like Sherman Tanks, because after hacking through two 1/4” inch thicknesses of fiberglass and two 3/4” inch thicknesses of marine ply I still could not lift a section of the top. The only other thing I could do was take measurements on the three sides of the box that I could reach and assume the insulation foam inside was still good. These measurements indicated about 2” inches of insulation on two sides and 1” inch only on the other. This was not enough to maintain a proper ice box never mind a freezer.

I bought a refrigerator thermometer and hung it inside the box then started a series of tests to see how long and at what temperature a 16 Lb bag of ice would keep the temperature at the lowest.

The first test was with a single 16 Lb bag of ice in the upper section of the box above the shelf. This eventually reduced the temperature to 42 degrees Fahrenheit but only for about 24 hours before the ice began to melt and the temperature rose. I could also feel the outside of the box was colder than surrounding panels that meant there was “leakage” through the insulation to the outside.

On the second test I filled the space below the shelf with solid block ice that I had frozen in our home freezer. This time a 16 lbs bag of ice lasted 42 hours before it began to melt. Strangely the block ice still remained three quarters solid which I think was because the cold from the bag of ice sank and kept the blocks frozen.

These tests over a number of days were quite consistent because Britannia has two very efficient air conditioners that can keep the saloon at a regular 75F degree. If the saloon ambient temperature had varied from day to day the test results would have also varied considerably.

It was obvious even to my inexperienced eye that a lot of insulation was needed, so after again consulting with the Cruising Forum pundits I decided to buy a 4’ foot x 8’ foot sheet of 2 ”inch thick high density foam called “Parma R” for $27.5 from our local hardware store. This  has a tin foil backing on one side. I made accurate cardboard templates of the three sides and cut the foam carefully with a sharp bread knife. I than made two pieces for each side panel, so my insulation thickness would be an extra four inches on three sides.

I glued the foam panels to the outside of the box using Liquid Nails Panel and Foam adhesive the tin foil side outwards. This glue does not melt foam like other glues. I allowed the first layer to dry for a day before sticking the second layer on top then filled in all the joints and areas where I could not get any foam, using Aerosol foam insulation  When all the new insulation was glued in place it was time for a third test using another 16 Lb bag of ice and solid block ice below the shelf. This time the temperature inside the box sank to 39F and stayed like that for two extra days. Better still I could not feel any cold on the outside of the new insulation.

I felt some satisfaction in achieving this small advance because I had evidently improved the insulation significantly for only a small cash outlay. I asked myself why the builders didn't do this when the boat was built?

The temperature graph shows the differences between the three tests but I remained mystified why, after all the new insulation was fitted the temperature did not drop much below 40F. I was told that even in a well insulated box the holding plate temperature must be about 10 degrees lower than the temperature required in the freezer. Therefore in order to maintain freezing inside the box the plates needed to go down to minus 22F. Assuming the temperature of the bag of ice was at freezing, i.e.32F I was actually doing quite well to read 39 on my test.

This is the three tests made to determine the insulation of the ice box.I now had to decide whether to buy a freezer unit. These are not cheap, starting around $1900 to upwards of $4,000 for higher specifications.

Refrigerators and freezers all work on the same principal and with an abundance of detailed explanations on the web there is no need to repeat that much technical detail here. Simply put: a compressor pumps freon gas through plates mounted inside the freezer box. The freon absorbs heat and causes the inside of the box to get cold. There are basically two types of freezer plates: evaporator plates and holding plates. Evaporator plates are like those in a household fridge/freezer, thin corrugated wrap round plates usually in the top of the fridge. These freeze quickly, but because they are so thin they also un-freeze quickly and the compressor needs to be running almost continuously to keep them frozen, that it can do in a house. Holding plates are much thicker, up to 3” inches if there is space inside the cabinet. Holding plates take longer to freeze but they stay frozen longer, so once they are frozen it takes less power to keep them there. For any boat, particularly a sailboat, holding plates are the best solution for a freezer.
                                                                                         CHOOSING THE EQUIPMENT

I sent a drawing of my box showing the insulation to four suppliers of marine refrigeration equipment, asking for recommendations, specifications and prices. One didn't reply at all, another was so difficult to drag a price out of I gave up. Finally I choose Sea Frost in Barrington New Hampshire who were the most helpful. (www.seafrost.com) They could supply all the equipment along with custom sized holding plates. The owner, Cleave Horton, is extremely knowledgeable and recommended two holding plates, one each side inside the box connected together to the compressor. These would be 15” inches square x 1” inch thick and would just fit through the 12” inch square lid of the box. I would therefore loose 2” inches in the upper box width. I asked Cleave if it might be better and cheaper to have one 2” inch thick holding plate? His reply was, “Think of it as standing in front of a fire in your house. Only your back gets warm, but if you were between two fires you would toast evenly.” I thought this was a good analogy and I’m sure it is the sort of thing an inexperienced buyer can understand.

This shows the two holding plates in the freezerAnother important item to consider in any freezer system is the compressor and associated equipment. There are electric driven compressors of which by far the most popular make is Danforth. Then there are engine driven compressors that are more powerful and don't deplete batteries. There are also air cooled compressors and water cooled compressors. Difficult choices indeed for an apprentice.

As usual on boats there are pros and cons for each type. My boat has a very large battery bank of over 1300 amp hours and numerous ways to keep them charged. I have a wind generator, a 6.5 kw generator with both a 12-volt alternator and 120-volt outputs, that also powers the 40 amp battery charger. This is not counting the main engine alternator, so I decided to buy a 12-volt air cooled system.

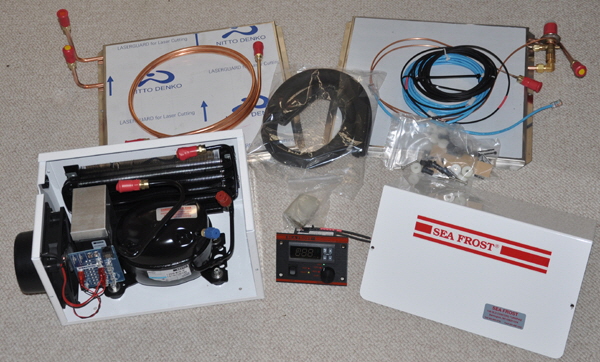
The compressor, along with its condenser, (the radiator part that dissipates the hot air), and the control electronics are particularly well made on the Sea Frost units. All the items are enclosed in a strong metal box that keeps dust and dirt out and allows for other things to be stored in the same locker without resting on the equipment. All the other manufacturers I looked at had open equipment. The control unit can be mounted anywhere and is connected to the holding plates with pipes preloaded with liquid freon and employing self sealing couplings. My pipes were made exactly the right length to my drawing and fitted a holding plate on each side of the box.

Sea Frost's instruction manual is meticulous that is very helpful to a novice, and it even includes photographs of how to bolt the pipes together using two wrenches, so as not to over tighten the connectors.

I had ordered the latest Danforth BD80XP compressor that they say uses less power, along with a fully programmable remote electronic thermostat. Sea Frost built and shipped my order in one week. The cost was $2312.00

Before installing the holding plates I decided to repair a few chips in the fiberglass and paint the box with two pot epoxy paint that made the inside look new.

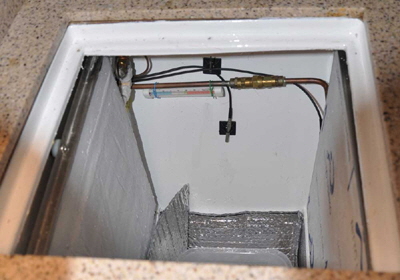
I found the installation to be quite straightforward. I screwed the plates to both sides of the box using the special fasteners supplied, that hold them clear of the wall of the box about 1/4” inch to permit all round circulation. Then I drilled a 1” inch hole through the side of the box and passed the pipes and thermostat wires though. The trickiest pipes to fit were the ones that connect the holding plates together inside the box. I followed the detailed pipe connecting instructions and managed it with no loss of freon. The other end of the pipes connect to the compressor unit.

The compressor and controls were installed in the seat locker next to the freezer.I mounted the compressor cabinet under a saloon seat next to the freezer. A small fan circulates air through the condenser radiator inside the cabinet and blows it into a cupboard under the sinks that has a louvered door. I therefore had a good circulation of ambient air through the unit.

I then wired the electronics into my 12-volt distribution board circuit with a 30-amp breaker marked “freezer.”

Finally, on further advice from my trusty Cruising Forum friends I lined the inside of the freezer box with 1/4” inch thick bubble wrap, with foil on both sides. This is used to line freezers and ice boxes in RV’s and easily removable for cleaning. I also fitted a ball valve on the water drain pipe in the bottom of the box to prevent even the slightest amount of cold escaping down the pipe.

Amazingly, when the moment of reckoning arrived everything started to hum with no leaks and was also amazingly quiet. The holding plates immediately started to get cold to the touch and after about two hours we found ourselves with a superb little freezer, that stays at 26F all the time.

It is certainly one of my better modifications to our good old boat
This alteration can also be seen on the before and after drawings

.

Freezer - header
Back to navigtion
This shows a kit of parts to convert a ice box into a freezerr.